Getting started
- Introduction
- Know where to get help
- Use RCP for the right reasons
- Use the correct version of RCP
- Use the correct tools
- Set up a target platform
- Mirror Eclipse repositories
- Create a product configuration
- Define products with feature based dependencies
- Remove versions from product dependencies
- Always run code using a product configuration
- Get your product building right away
What is a product configuration file?
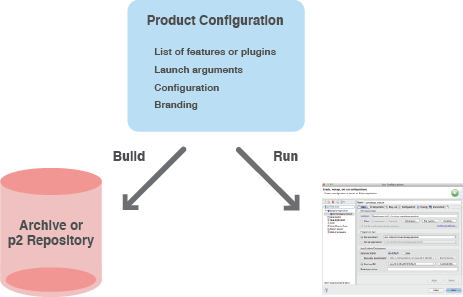
The product configuration file is kind of a strange animal. While not used at runtime, it is extremely important and we should learn to this file appropriately. Part of the confusion surrounding product configuration files (and the products that they define) is that they define multiple somewhat unrelated types of information.
- Dependencies – The set of features or bundles that should get shipped as part of a build. This is a subset of the features and bundles available in the current workspace and target platform.
- Launch arguments – The arguments that should be passed to the executable on startup. These may include Eclipse arguments or JVM arguments.
- Configuration – Generally, things that go into the
config.inifile. For example, specifying bundle start levels. - Branding – Splash screens, launcher names, About window images and text, etc.
So what ties all of this information together? The best way to understand product configuration files is to look at how they are used.
Using product configuration files
There are two uses for a product configuration file, and these two uses can be looked at as being two sides of the same coin.

Production configuration files allow us to build a set of branded and configured artifacts that can be packages as an archive or published to a p2 repository. This can be done either using the Eclipse Product export wizard link on the Overview of the Product Configuration editor or using a Tycho headless build. In either case, the dependencies, launching arguments, configuration settings and branding elements will be combined to produce the output.
Product configuration files also allow us to run our code in the Eclipse IDE. This is done by clicking on the Launch an Eclipse application link on the Overview tab of the Product Configuration editor. In this case, the dependencies, launching arguments, configuration settings and branding elements are combined to produce a run configuration that defines how your code is executed in the IDE.
As we’ll explore in future posts, it’s the equivalence of these two actions that is the key. Our goal is to always make sure that what we are running in the IDE is exactly equivalent to what we are building. Proper use of product configuration and target definition files provides us with this equivalence.
Creating a product configuration
There’s not too much to creating a product configuration file. There is a Product Configuration Wizard that creates the file and a Product Configuration Editor which allows us modify the underlying XML. Like target definitions, the product configuration file should live in it’s own project (General > Project in the New Project Wizard). This is a Maven Tycho requirement.
The name of this project should be something like:
com.modumind.myapp.repositorycom.modumind.myapp.p2com.modumind.myapp.updatesite
The reason for this is that the Tycho output for this project is actually a p2 repository. As we’ll see later on, we can also build individual features, and they will also have a similar project that outputs the repository
